7470.EXE is a Win32-based emulator for the HP 7470A plotter. It will acquire an HP-GL/2 plot and render it in a window. The plot can then be printed, viewed as an overlay with other plots, or saved in several different graphics file formats as well as its original HP-GL/2 format.
With the help of 7470.EXE, you can capture screenshots from GPIB-based test equipment such as digital oscilloscopes, spectrum analyzers, logic analyzers, and more. 7470.EXE can even recognize certain instrument models and and request plots from them without user access to their front-panel controls.
7470.EXE is part of the KE5FX GPIB Toolkit. The latest version of the Toolkit is downloadable here.
Running 7470
Depending on the options you selected during installation, you can run 7470.EXE from the Start menu, by clicking on its desktop shortcut, or by using its Quick Launch icon on the taskbar. You can also run 7470.EXE from a DOS-box command line or Windows Start->Run... command, optionally specifying a GPIB address from which to acquire host-requested plots (see below), or the names of one or more existing HP-GL/2 data files. Use quotes around filenames that contain spaces - for example,
      7470 "IMD test.plt"            ... Display "IMD test.plt" by itself

   7470 before.plt after.plt      ... Overlay before.plt and after.plt

   7470 (no command-line options) ... Display all plots in the current directory
You can acquire your own HP-GL/2 .PLT files via the options on the Acquire menu, if your PC has a National Instruments-compatible GPIB interface or a Prologix GPIB-USB/GPIB-LAN adapter. It's important to understand that there are two ways to do this in 7470.EXE. Unlike other plotter emulators, 7470.EXE supports both host-requested and device-initiated plotting operations.
Host-Requested Plots
A few instruments, currently limited to the following models, support "host-requested" plotting in 7470.EXE.
- Tektronix 490P/2750P-series spectrum analyzers (including 492P and 496P)
- Tektronix 2710-series spectrum analyzers
- Tektronix 2782/2784 spectrum analyzers
- HP 3561A dynamic signal analyzers
- HP 3585A/B spectrum analyzers (see notes below)
- HP 8566A/8567A/8568A spectrum analyzers (see notes below)
- HP 8566B/8567B/8568B spectrum analyzers
- HP 8560A/B/E and 8590-series portable spectrum analyzers
- HP 54100- and 54200-series digital oscilloscopes
- Tektronix 2430A, 2432/2432A, and 2440/2440A digital oscilloscopes
- Tektronix SCD-series transient digitizers (ROM version 1.5 or later)
Normally, you'll issue host-initiated plot requests by selecting one of the "Request plot from supported device at address n" options on the Acquire menu. Instrument shortcut entries (see below) can also be selected. Note that earlier Prologix adapters, and those with their DIP switches set to Device mode, can't support host-requested plots at all.
Most instruments that support host-requested plots may be addressed directly on the 7470.EXE command line, just like a .PLT filename:
7470 3The above example is suitable for inclusion in a Windows desktop shortcut. When clicked, the shortcut will launch 7470.EXE, which will then immediately request a plot from the supported instrument at GPIB address 3. This feature allows you to capture screenshots with a single mouse click on the host PC.
Host-Requested Plots via Instrument Menu Shortcuts
Beginning with the 1.80 release of 7470.EXE, you can also add strings of the form
instrument_0 Tektronix 2430A at GPIB address 4\tF2to the 7470.INI file in the 7470.EXE program directory. The file contains several entries that illustrate how this is done. (See below for more information on 7470.INI.) If any of these entries are present (and not commented out with a leading semicolon), the Acquire menu will include a list of the instrument name/address specification strings and allow you to select one with the mouse, or, alternatively, by pressing a function key.
Important note for HP 8566A-8568A, HP 3585A/B, and HP 8510-series users
Some instruments can't be automatically identified and addressed by 7470.EXE, and many also don't support HP-GL/2 plotting at all. Fortunately, 7470.EXE can still work with a few specific models that are incompatible with other plotters and emulators.
HP 8566A, HP 8567A, and HP 8568A spectrum analyzers
In order to tell 7470.EXE to access one of these instruments, at least one instrument menu shortcut must contain the string "8566A", "8567A", or "8568A". When a shortcut key corresponding to an HP 8566A-8568A spectrum analyzer is pressed, 7470.EXE will request raw annotation, state, and trace data from the analyzer and generate its own HP-GL/2 .PLT file image based on it. This HP-GL/2 image may then be saved, rendered, and printed just like any other .PLT file. A typical menu shortcut for an HP 8566A-8568A spectrum analyzer looks like this:
instrument_0 HP 8566A / 8567A / 8568A (via HP-GL/2 emulation) at GPIB address 18\tF8The HP-GL/2 synthesis process for the HP 8566A-8568A analyzers takes place in less than a second, including the data acquisition itself. It's actually a great way to access the later HP 8566B-8568B models as well; not only are 7470.EXE's synthesized HP-GL/2 plots much faster to acquire, but certain features such as markers look much better than they do in the B-series analyzers' own plots. Note, however, that a few display features such as the 'C' trace and hardware diagnostic/error messages will not appear in a synthesized plot.
HP 3585A/B spectrum analyzers
In order to tell 7470.EXE to access one of these instruments, at least one instrument menu shortcut must contain the string "3585". When a shortcut key corresponding to an HP 3585A/B spectrum analyzer is pressed, an HP-GL/2 plot will be synthesized from raw instrument data, as with the HP 8566A-8568A support process described above. A typical menu shortcut for an HP 3585A/B spectrum analyzer looks like this:
instrument_0 HP 3585A/B (via HP-GL/2 emulation) at GPIB address 11\tF3HP 8510-series vector network analyzers
In order to tell 7470.EXE to access one of these instruments, at least one instrument menu shortcut must contain the string "8510". When a shortcut key corresponding to an HP 8510-series VNA is pressed, a conventional HP-GL/2 plot will be fetched and rendered. A typical menu shortcut for an HP 8510-series vector network analyzer looks like this:
instrument_0 HP 8510 series at GPIB address 16\tF9
Again, the normal host- or device-initiated plot menu options will not work with these instruments.
Beginning in version 1.92, a few instrument-menu shortcuts are included by default in 7470.INI. If your 8566A-8568A analyzer's GPIB address is 18, you don't have to modify 7470.INI at all -- just hit F8! Likewise, F9 will acquire a plot from an 8510-series network analyzer by default.
Device-Initiated Plots
If your instrument doesn't appear in the list above, that means it isn't directly supported by 7470.EXE, and won't work with the Acquire->Request functions, instrument menu shortcuts, or the command-line GPIB address feature. However, chances are good that you can still obtain plots from it by activating its front-panel "Plot" button while 7470.EXE is in the "Wait for device-initiated plot" mode. This mode may be selected from the Acquire menu, or by pressing the lower-case 'w' key.
GPIB Instrument and Interface Configuration Notes
Host-requested plotting requires 7470.EXE to carry on a two-way GPIB conversation with the instrument, so you'll need to configure your instrument for Talk/Listen mode (as opposed to Talk-Only or System Controller mode) for use with this feature. This typically involves changing a system-level menu option or DIP switch. All National Instruments GPIB adapters support host-requested plotting, but only versions 3.1 and later of the Prologix GPIB-USB adapter can provide the necessary GPIB controller functionality. All Prologix GPIB-LAN adapter versions are compatible. (For more information on the Prologix adapters, you can contact Prologix here.)
Device-initiated plotting usually requires the instrument to be configured for Talk-Only mode. When their front-panel PLOT buttons are pressed, some instruments, such as the HP analyzers, expect the plotter to be addressable at a specific GPIB address, usually 5. The emulated plotter address is normally controlled by 7470.EXE's GPIB menu, unless an older Prologix adapter with DIP switches is in use. Certain instruments expect to be the only addressable device on the bus when their PLOT buttons are pressed, requiring selection of the "Listen only" option in 7470.EXE's GPIB menu.
As you can imagine, experimentation is sometimes needed to find the right combination of device and host settings that will allow 7470.EXE to work with a particular instrument. Some notes on specific instruments appear below.
- Tektronix 490P and 2750P spectrum analyzers
- Device-initiated plots: Must be set to Talk-Only mode via DIP switch in rear. This may cause problems if other devices are on the GPIB bus. 7470 GPIB setting must be "No assigned plotter address (listen only)." Plot with front-panel PLOT button (typically Blue Shift-PLOT).
- Host-requested plots (recommended): Both Talk-Only and Listen-Only switches should be off (0). LF-or-EOI switch does not matter for use with 7470.EXE, but should be set to on (1) for use with SSM.EXE and PN.EXE utilities.
- DIP switches on these instruments are extremely prone to age-related failures. Verbum sat sapienti est.
- Tektronix 2782 and 2784 spectrum analyzers
- Device-initiated plots: GPIB board must be connected to dedicated plotter output port on rear panel. 7470 GPIB setting must be configured to listen on address 5. (Note that the analyzer cannot be controlled via this port, so many GPIB Toolkit users will want to use host-requested plots instead. These work by synthesizing an HP-GL/2 plot from raw instrument data obtained from the GPIB control port.)
- Host-requested plots: This feature uses the HP-GL/2 synthesis code developed for the HP 8566A-8568A analyzers. In the current implementation, markers and traces other than NORMAL and A will not be visible in plots requested from a 2782/2784.
- Tektronix 2430A / 2432 / 2440 DSOs
- Device-initiated plots: DSO must be set to "Plotter" device mode. 7470 GPIB setting must be "No assigned plotter address (listen only)."
- Host-requested plots (recommended): DSO must be set to T/L device mode. 7470 GPIB setting does not matter.
- 7470.EXE will NOT work with the earlier 2430 model, since it does not support GPIB plotting at all.
- Tektronix SCD-series transient waveform digitizers
- Device-initiated plots: Issued automatically after triggered acquisition is complete
- Host-requested plots: Available on ROM versions 1.5 and later; earlier versions must use device-initiated plotting
- HP 8566B, 8567B, and 8568B spectrum analyzers
- Device-initiated plots: 7470 must be configured via the GPIB menu to listen at address 5.
- Press "Lower Left" button on front panel for device-initiated plotting.
- Host-requested plots are also possible with these analyzers. For faster plotting, though, try the 8566A/8567A/8568A-series menu shortcut (F8) technique described above!
- Other HP 8560- and 8590-series spectrum analyzers are reported as working like HP 8566B. Host-requested plots may work on these; if not, device-initiated plots should be possible.
- HP 8566A, 8567A, and 8568A spectrum analyzers
- These do not support HP-GL/2 plots at all, either device-initiated or host-requested. See notes above on how to work around this limitation.
- Other instruments known to be compatible with 7470.EXE for device-initiated plotting
- Tektronix TDS694C and related oscilloscopes
- Tektronix TDS784D and related oscilloscopes
- Tektronix 370A curve tracer
- Tektronix SCD series transient digitizers
Pre-V1.5 instruments do a screen dump immediately after acquisition
- Advantest R3762AH vector network analyzer
- Advantest R3361A spectrum analyzer
- Advantest R4131B spectrum analyzer
- Advantest R3261C spectrum analyzer
- Advantest R9211E FFT analyzer
- LeCroy 9354AM DSO
- Giga-Tronics 8003 scalar network analyzer
- Gould 4072 DSO
7470 GPIB setting must be "No assigned plotter address (listen only)"
- HP 3040A cable analyzer
- HP 54201A DSO
- HP 54502A DSO
7470 GPIB setting must be "No assigned plotter address (listen only)"
- HP 54110D DSO
7470 GPIB setting must be "No assigned plotter address (listen only)
DSO must be in talk-only mode
For maximum text legibility, switch 7470.EXE to 1024x768 mode (Display->1024x768, or hit the '0' key) - HP 853A/8559A spectrum analyzer
7470 GPIB setting must be "No assigned plotter address (listen only)"
- HP 8510B vector network analyzer
- HP 8752C vector network analyzer
- HP 8756A scalar network analyzer
- HP 8757A scalar network analyzer
For device-initiated plotting with the 8756 and 8757 network analyzers, the GPIB adapter must be connected to the System Interface port, not the main HP-IB port. If using a Prologix adapter, make sure the firmware is up to date. It may be necessary to disconnect any floppy drives or other peripherals controlled by the analyzer in order to obtain plots.
- HP 8753A vector network analyzer
- HP 3562A dynamic signal analyzer
- HP 5372A frequency/time interval analyzer
- HP 8569B / 8570A spectrum analyzer
7470 GPIB setting must be "No assigned plotter address (listen only)"
- HP 4194A / 4195A network/spectrum analyzer
7470 GPIB setting must be "No assigned plotter address (listen only)"
Use Copy->HP_IBDefine->Talk Only, then set Plot_mode and do Copy Start - HP 3577A network analyzer
7470 GPIB setting be "No assigned plotter address (listen only)"
HP 3577A must be set to Talk-Only mode - HP 3588A / 3589A spectrum analyzer
7470 GPIB setting must match specified plotter address
Set System Controller mode in analyzer's HP-IB menu - Marconi 6500/6311 scalar network analyzer
7470 must be connected to private bus, addressable at 5, before powering up the analyzer
- Rohde & Schwarz FSA spectrum analyzer
- Rohde & Schwarz UPL audio analyzer
- Wiltron 562 network analyzer
Also, if you have more than two or three powered-down instruments on the GPIB bus, keep in mind that they'll load the bus, possibly preventing successful communication with the instrument(s) that are turned on. When attempting to use 7470.EXE with a new instrument for the first time, it's best to use a simple direct connection between the instrument and the host PC's GPIB adapter.
I'm always interested in hearing from users of other instruments so they may be added to the list above. Please feel free to contact me at jmiles@pop.net with any bug reports or success stories.
Menu Commands and Keyboard Shortcuts
Key Menu Command Remarks
l File->Load HP-GL/2 data Retrieves a saved HP-GL/2 file (.PLT, .HPG, .PGL, .HGL) for viewing
s File->Save image or HP-GL/2 data Saves the currently-browsed plot as an HP-GL/2 file. Also can be
used to save the current window contents (which may consist of
several overlaid HP-GL/2 files) as a .GIF, .BMP, .TGA,
or .PCX image file
p File->Print image Sends the current window contents to the default Windows printer
Home File->Close all visible plots Stop displaying/browing any currently-loaded plots. This command
does not delete any files; it simply removes them from
7470.EXE's current display list.
Delete File->Close current plot Stop displaying/browsing the currently-visible plot. This command
does not delete the file; it simply removes it from
7470.EXE's current display list.
Ctrl-Delete File->Delete current plot file Same as File->Close current plot, except that it deletes the
HP-GL/2 file being viewed
Esc File->Quit
Space or F5 View->Refresh current display Reloads the currently-visible HP-GL/2 file. If the file was
acquired as a host-requested plot in the current 7470.EXE session,
it will be re-acquired.
b View->Browse sources one at a time Allows you to use the +/- keys to move through the list of
viewable plots, displaying them one at a time
o View->Overlay all sources Renders the graphical (i.e., non-text) portions of all loaded
or acquired HP-GL/2 plots atop each other. In Overlay mode,
the +/- keys are used to determine which plot contributes
text labels to the display.
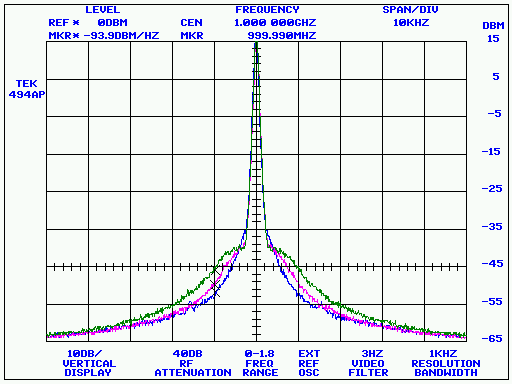
The three traces in the example image at the top of this page
were displayed with the View->Overlay command prior to being saved
as a .GIF file. (Use caution when closing or deleting a file in
Overlay mode. The visible text labels are the only way to tell
which file will be closed or deleted!)
+ View->Next source Navigates the list of visible HP-GL/2 plots. Specific behavior is
- View->Previous source determined by the choice of Browse/Overlay mode (above).
5 Display->512 x 384 Adjusts the size of 7470.EXE's window. Some crowded plots look much
Display->640 x 400 better at higher resolutions, but 7470.EXE will render an undersampled
6 Display->640 x 480 image if you you select a window size that's too large for the current
8 Display->800 x 600 Windows desktop. You can change the default window size in the 7470.INI
0 Display->1024 x 768 file (below.)
i Display->Alternate colors Useful for certain instruments such as the HP 8566/8568 analyzers
whose graticule and trace colors appear inverted in 7470.EXE.
(This option was added prior to the pen_colors array in 7470.INI,
which can be a better place to address color-rendering problems.)
c Caption->Edit caption text Allows you to enter text which can subsequently be placed at any
desired location by left-clicking on the currently-viewed plot.
Supported only in Browse mode.
e Caption->Erase most-recently-added caption ...
Removes the most-recently-added user caption from the plot. Supported
only in Browse mode.
w Acquire->Wait for device-initiated plot Enters a mode in which 7470.EXE waits for, and renders, HP-GL/2
data that arrives after pressing the front-panel PLOT button on an
instrument. You can press any key to exit this mode and restore
normal 7470.EXE operation.
W Acquire->Wait for device-initiated plot, Same as above, except that each incoming plot is sent to the
then print default Windows printer. If you set the auto_print_mode field in
7470.INI to '1', 7470.EXE will enter this mode on startup, acting
as an unattended HP-GL/2 print server.
Acquire->Beep when plot received If this option is selected, 7470.EXE will attempts to play the
.wav file specified by the beep_wav_filename field in 7470.INI
as soon as each incoming device-initiated plot has been received
The default setting is based on the beep_when_plot_received field.
Acquire->Request plot from supported When one of these options is selected, 7470.EXE will attempt to
device at GPIB address N(1-30) identify the instrument at the specified address and initiate a
host-requested plotting operation. This may entail sending
commands to the instrument to turn on its graticule display,
select HP-GL printing, and perform other setup tasks. Undefined
results may occur if the instrument does not appear in the list
under "Host-Requested Plots" above.
GPIB->No assigned plotter address During device-initiated plots, some instruments may need to
(listen-only) communicate with the (emulated) plotter, expecting to find it at a
specific GPIB address. Others may expect the plotter to be
GPIB->Plotter addressable at N(0-30) entirely transparent to the GPIB bus. This menu allows you to
specify the plotter's address, or to assign it no address at all.
When an older Prologix GPIB-USB adapter is in use, this functionality
is provided by its DIP switch, and the GPIB menu will have no
effect.
Mouse Controls
Left-click anywhere within a displayed plot in Browse mode to add the current caption text (Caption->Edit caption text...) to the plot at that location.
The modified HP-GL/2 file will be saved automatically after any user captions are added or removed.
7470.INI
The directory containing 7470.EXE should also contain a file called 7470.INI, which provides some configuration defaults that you can change if desired.
Most users won't need to edit this file. To configure the GPIB Toolkit for use with Prologix GPIB adapters, you'll need to edit CONNECT.INI instead, or run the Prologix GPIB Configurator utility (see below).
Here is an example of a 7470.INI file with comments explaining each line:
;

;Initial X/Y resolution

;


res_x                640

res_y                480


;

;If your plots appear clipped improperly, you can change the default

;renderer margins here.  (These default-margin settings will be overridden

;by any HP-GL/2 'IP' opcodes present in the file.)

;


x_margin             16

y_margin             16


;

;Set to '1' to display graphs in an alternate color set.

;Useful for the HP 8566B analyzer, possibly others

;

;'0' causes 7470 to use the default pen colors specified below

;


color_scheme         0


;

;Specify a higher value (in milliseconds) if 7470.EXE times

;out during device-initiated plotting

;


async_timeout        3500


;

;Options below are used to determine how the plotter responds to various

;output queries.  No effect unless a valid GPIB board address is specified.

;Lines in this group may be commented out if necessary to suppress replies

;to a given query

;


OE_reply             0

OH_reply             0,0,10000,7500

OI_reply             7470A

OP_reply             0,0,10000,7500

OO_reply             0,1,0,0,0,0,0,0

OF_reply             40,40


;

;Set to '0' to suppress replies to OS (Output Status) command

;


process_OS           1


;

;Set to '1' to autodetect pen-storage commands in device-initiated plots,

;avoiding the need to wait for the async_timeout interval to expire at the

;end of each plot.  Set to '0' if plots appear to be terminated prematurely

;


SP0_detect           1


;

;Plots with fewer bytes than this are assumed to be preambles for multistage

;operations (e.g., device-initiated plots from the HP 8756A) rather than

;complete, standalone plots

;


min_plot_bytes       128


;

;Sets the default plotter address in the GPIB menu.  Use -1 for

;listen-only mode

;


default_board_addr   5


;

;For diagnostic/optimization purposes

;


async_xfer_size       100

async_GPIB_timeout_ms 1000

serial_read_timeout   500

release_sys_control   0

ignore_write_aborts   1

min_plot_bytes        128


;

;Caption text applied when left-clicking on plot

;(leading spaces ignored)

;

;If this field is blank, the user will be prompted to enter the

;caption text

;


caption_text


;

;Set to '1' to execute a 'W' (Acquire->Wait for device-initiated plot, then print)

;function automatically when 7470.EXE starts.  Helpful if you want to make an

;unattended PC act as a dedicated HP-GL/2 print server

;


auto_print_mode      0


;

;Uncomment this line (remove the leading semicolon) to force

;7470.EXE to exit immediately after acquiring a plot and saving it.

;Normally, this line should be left commented out to run 7470 in its

;'interactive' mode.  Note that if any command-line parameters are

;supplied when launching 7470, the auto_save_filename option is ignored

;


;auto_save_filename   c:\my documents\automatic capture.gif


;

;Set beep_when_plot_received to '1' to play a sound after each new

;device-initiated plot has been received

;

;Sound may optionally be specified as a .wav filename.  If beep_wav_filename

;is commented out, a default system alert sound will be played

;


beep_when_plot_received    0

beep_wav_filename          c:\program files\ke5fx\gpib\beep.wav


;

;Enable to write incoming/outgoing GPIB traffic to a file during

;reception of device-initiated plots

;


;traffic_diag_filename      c:\traffic.txt


;

;Optional list of instrument/address pairs for the Acquire menu

;

;Entries should have the form 'instrument_n    xxxx at GPIB address ',

;where n is an arbitrary value or name and xxxx is the name of the

;instrument at the specified address.  Optionally, the entry value may end

;in a '\tFn' substring to assign a keyboard shortcut to the instrument.

;(Don't use F1 or F5 -- they are reserved by 7470 for other functions.)

;

;If any entries are present, then they will be added to the Acquire menu.

;This feature is valid ONLY for those instruments for which 7470

;supports host-requested plots!

;


instrument_0         Tektronix 2430A / 2432A / 2440A at GPIB address 4\tF2

instrument_1         HP 3585A/B (via HP-GL/2 emulation) at GPIB address 11\tF3

instrument_2         Tektronix 49x at GPIB address 3\tF4

instrument_3         HP 8566B / 8567B / 8568B at GPIB address 18\tF6

instrument_4         HP 8566A / 8567A / 8568A (via HP-GL/2 emulation) at GPIB address 18\tF8

instrument_5         HP 8510 series at GPIB address 16\tF9


;

;Pen RGB color array

;


pen_0                255,255,255 `White

pen_1                0,0,0       `Black

pen_2                0,0,255     `Blue

pen_3                0,192,0     `Green

pen_4                128,128,0   `Dark yellow

pen_5                255,0,0     `Red

pen_6                255,0,255   `Magenta

pen_7                0,255,255   `Cyan
CONNECT.INI
The program directory should also contain a file called CONNECT.INI, which tells the GPIB Toolkit how to take advantage of various GPIB connectivity options. These include direct RS-232 or TCP/IP links, as well as the Prologix GPIB-USB and GPIB-LAN adapters.
If you have a Prologix adapter, you can review the comments in CONNECT.INI to learn how to configure 7470 and the other GPIB Toolkit applications to use it, or you can simply select your adapter in the Prologix configurator application (PROLOGIX.EXE) and press "Update CONNECT.INI" to automate the configuration process.
If the COM port specification in CONNECT.INI is commented out with a leading semicolon -- or if CONNECT.INI is missing entirely -- all GPIB Toolkit applications will attempt to communicate with the GPIB0 device via the National Instruments NI488.2 programming interface instead. This is the default behavior.
Note that some versions of Windows hide .INI file suffixes by default. In Windows 2000 and XP, for instance, CONNECT.INI may appear simply as "CONNECT," with the type "Configuration Settings." To turn off this behavior, go to the Tools->Folder Options->View tab in any Explorer window and deselect the "Hide file extensions for known file types" option.
Release Notes
Release 0.91 of 31-Oct-01
- Some formatting improvements and assorted updates, but still an alpha release!
- Takes multiple files or GPIB addresses to plot, overlay-style
- Runs at 800x600 by default
- Lets you print the current plot on any Windows-compatible printer by hitting 'p' (inkjets are great for this!)
- This release also includes source for my GPIBLIB wrapper for National Instruments NI488 drivers.
- Wildcards can now be used on the command line (e.g., 7470 ..\myfiles\*.plt)
- If wildcards are used, all matching files will be displayed one at a time. Use the + and - keys to navigate the file list. You may also run 7470 by itself to display all .PLT, .HPG, .HGL, and .PGL files in the current directory.
- Hit 's' to save the current plot as a 16-bit .TGA file. Many photo editors, including Microsoft's, will allow you to manipulate these files and convert them to other common formats such as .GIF, .BMP, or .JPG.
- Made some improvements to the GPIBLIB wrapper to support instruments like the HP5345 and HP5370 counters that use terminator characters to delimit transmitted strings.
- Added example "get current frequency" programs for these counters in their respective subdirectories.
- Sending a GPIB device-clear message is now optional behavior for GPIB_startup(), and disabled by default. This change was needed to avoid resetting the HP5370B counter during GPIB handshaking. It doesn't seem to have affected any other instruments.
- Beta release of the new and improved 7470.EXE: near-complete rewrite.
- All commands accessible via Windows menu
- Saves .GIF, .BMP, and .PCX files directly from program
- New "wait for plot" feature should (theoretically) support any instrument in talk-only mode
- Many UI improvements including resolution switching and overlay/browse modes
- Many improvements, including more supported instruments, better HP-GL rendering fidelity, 7470.INI setup options, and more
- Added response options for several plotter output-status queries, necessary to support HP 8752C VNA and many other instruments
- Added auto_save_filename, other options to 7470.INI
- Default suffix for saved files is now .PLT, not .GIF
- Revised handling of UC (User Character) opcodes
- Reduced buffer size used by GPIB_read() from 64K to 4K. This function can no longer be used to acquire a large block of data such as an entire plot.
- 7470.EXE is now installed with the larger KE5FX GPIB Toolkit package
- Improved character-positioning code in renderer
- Added support for host-requested plotting from Tektronix 2710-series spectrum analyzers
- Significant GPIBLIB rework to add support for Prologix GPIB-USB adapter
- Added instrument name/address/function-key feature to 7470.INI
- Added user-configurable RGB pen colors to 7470.INI
- Fixed a bug that could cause blank pages to be printed on a LaserJet
- Added HTML user guide
- Windows desktop no longer used as the working directory when running from a desktop icon
- Renderer now supports device-initiated plots from HP 3562A dynamic signal analyzer
- HP-GL/2 OF and OO commands supported
- SC command supports parameter-free form
- HP 8566A/8567A/8568A spectrum analyzers supported (via NI GPIB interfaces only)
- Host-based HP-GL/2 synthesis used to create .PLT image from raw analyzer data
- GPIBLIB updated to inhibit EOI assertion at end of host-transmitted strings
- Renderer now supports device-initiated plots from Advantest R3361A spectrum analyzer
- Selected pen restored to its equivalent physical position after an SC command
- Parameter-free SC command uses reasonable (nonzero) defaults
- Tektronix SCD-series transient digitizers supported
- HP 5372A time-interval analyzer supported
- Extensive changes made to simplify the code that handles generating and refreshing temporary .PLT files. (Most users will not notice any operational differences.)
- Added support for software-based GPIB address-selection feature in new Prologix adapter firmware
- Moved controller_mode, device_addressable, and host_addressable fields from 7470.INI to CONNECT.INI. These options now apply to all applications in the GPIB Toolkit, not just 7470.EXE. If you want to keep your existing 7470.INI file when upgrading, you'll need to move these three options to CONNECT.INI yourself.
- Added reset_to_local field to CONNECT.INI. This affects Prologix adapters only; see CONNECT.INI for more information
- HP 8568A rev-B spectrum analyzer successfully tested with new software-addressable Prologix adapter
- HP 3588A spectrum analyzer supported
- Negative ASCII characters rendered as spaces
- Rohde & Schwarz FSA spectrum analyzer supported
- Fix potential bug with device-initiated plots on the HP 8566B-8568B analyzers using Prologix adapters
- GPIB library ignores device_addressable and reset_to_local fields in CONNECT.INI if controller_mode is 0
- Don't check iberr after ibrd() or ibwrt() unless ibsta has ERR bit set (attempt to improve compatibility with NI GPIB-232CT-A)
- Always reset devices to local control at shutdown time when using NI-compatible GPIB interfaces
- Serial ports beyond COM9 are now supported. Thanks to Bill Tracey, KD5TFD, for this patch!
- Added min_plot_bytes field to 7470.INI to allow small (preamble) data blocks from instruments such as the HP 8756A network analyzer to be disregarded
- Increased X and Y screenspace margins from 4 to 8 pixels to reduce text-clipping problems on some instruments (e.g., HP 54502A)
- Fixed a bug that caused occasional failures to accept device-initiated plots from HP 8566B-8568B analyzers via Prologix GPIB adapters
- Saved .PLT files are now zero-terminated to prevent a possible buffer-overflow condition in the renderer
- Some tweaks for HP 54110D DSO support
- F2, F4, and F8 instrument shortcuts enabled by default in 7470.INI, for demonstration purposes
- Fixed a bug introduced in 1.92 that could cause text-rendering problems on certain HP 8566B-8568B plots
- Improved color fidelity in .GIF and .PCX files, particularly when saved at higher display resolutions
- Enabled EOS termination in device-initiated plot mode on NI cards. This shouldn't cause problems for anyone but if it does, please let me know.
- Changed 7470.INI file entry async_GPIB_timeout to async_GPIB_timeout_ms. All applications that call GPIB_connect() now specify their timeout parameters directly in milliseconds, rather than using the GPTIMEOUT type. As with the 1.94 update above, this change should not affect most users of the GPIB Toolkit
- 7470.exe no longer enables board-level EOS termination during device-initiated plots, due to problems reported with certain instruments (e.g., Wiltron 562). (Board-level EOS checks were originally added for the benefit of the listen.exe command-line utility, but they're not useful in 7470.exe.)
- The use of instrument-menu shortcuts in the 7470.INI file no longer disables the "Request plot from supported device at address xx" options in the Acquire menu
- Added basic support for host-requested plots from the Tektronix 2782/2784 spectrum analyzers (see notes above)
- Display-line support added in synthesized HP-GL/2 plots for the HP 8566A-8568A analyzers
- Added support for host-requested plots from HP 54200-series DSOs (tested with HP 54201A)
- Added support for host-requested plots from HP 8510-series vector network analyzers (see notes above)
- Added support for host-requested plots from HP 3585A/B spectrum analyzers (see notes above)
- Added x_margin and y_margin entries to 7470.INI to allow the default plot margins to be changed
- New code to center file dialogs within the main window
- Prompt before overwriting existing files with the Save command
- Added Caption menu to allow user labels to be added to plots
- Viewing a plot from a Tektronix 278x analyzer no longer toggles the alternate-color state for all other loaded plots
- Added workaround for a firmware bug in certain HP 8590-series spectrum analyzers that could cause vertically-compressed rendering in 7470.exe and PrintCapture
- Added support for host-requested plots from HP 3561A dynamic signal analyzer
- Extensive revisions to HP-GL renderer made to accommodate Advantest R9211E and other devices that use multiple plotting windows
- Improved rendering of HP 54502A plots
- When rendering .PLT files acquired from earlier versions of 7470.EXE, it may be necessary to increase the x_margin and y_margin values in 7470.INI to avoid clipping problems
- Removed Display->Aspect correction menu options, which are no longer needed
- The last version of the GPIB Toolkit with the original HP-GL renderer can be downloaded at http://www.ke5fx.com/gpib/setup148.exe
- The Acquire and GPIB menus now work exactly the same way with Prologix and National Instruments adapters
- Removed controller_mode, device_addressable, and host_addressable fields from CONNECT.INI, replacing them with is_Prologix
- If is_Prologix is nonzero, the Prologix adapter is assumed to be capable of software-based mode and address configuration
- Users of other interfaces, as well as early Prologix adapters that don't support programmable addressing, will need to edit CONNECT.INI manually to set is_Prologix to 0
- Captions from all loaded files are visible in Overlay mode
- Added Acquire->Beep when plot received option (and corresponding 7470.INI field)
- Waiting for device-initiated plots is now interruptable with left click anywhere onscreen
- User captions in Overlay mode are now keyed to the assigned pen color for that trace
- Renamed SERIAL.INI to CONNECT.INI, and added TCP/IP support
- Fixed a bug that could cause failures with GPIB addresses specified on the 7470.exe command line
- Added File->Close all visible plots option (keyboard shortcut: Home)
- Added support for host-requested plots from HP 8753-series network analyzers
- Added two instrument shortcuts to 7470.INI (HP 8753 series at address 16, and HP 54201A at address 5)
- Acquisition from HP 54201A no longer selects the alternate pen color set automatically
- Plots requested from 8510-series analyzers are resized to occupy the entire page
- Acquired .PLT files are no longer saved in the Program Files subtree
- HP 8753 series analyzers no longer report "Addressed to talk with nothing to say" when transmitting host-requested plots
- Added traffic_diag_filename field to 7470.INI to help troubleshoot device-initiated plotting
- Increased size of temporary memory buffer used to receive incoming plots to 4 MB
- Text-layout improvements in 3585A/8566A/8568A plots
- Host-requested plots are now supported for Tektronix 492P and 496P analyzers. Displays in zero-span mode and LIN mode are not plotted
- Host-requested plots are now supported for HP 70000-series analyzers (logarithmic display modes only, markers unsupported)
- Added support for host-requested plots from HP 54100-series DSOs (tested with HP 54111D)
- Added a workaround for truncated PA commands from the Tektronix 370 curve tracer
- Captions may now be created and erased in the currently-selected plot in Overlay mode
- Text from erased captions becomes the default text for subsequent captions, making it easy to reposition captions with the e key and left mouse button
- Fixed bug affecting XT and YT tick mark placement (Tek 2430A/2432A/2440 graticules)
- Plots from HP 8753 series analyzers should now be requested with the F9 shortcut (Acquire->HP 8510 or 8753 series). The previous shortcut, F11, was yielding incomplete or misaligned plots on some instruments.
- HP-GL label text in Browse mode is now rendered in the selected pen color, rather than black. As before, user captions are rendered in black in Browse mode, and all text drawn in Overlay mode is based on the order in which each plot was loaded or acquired.
- Bumped the default x_margin and y_margin values in 7470.INI from 16 to 24 pixels to avoid excessive clipping on some plots
Acknowledgements and Additional Notes
My graphics library (WinVFX) doesn't support scalable/rotatable vector fonts. Consequently, text elements in plots will not appear exactly as they do when rendered by a LaserJet or HP-GL/2 plotter.
Thanks to Harrison Hooker, W8YMO for supplying information on the obsolete HP7470A command set.
Thanks to Vladan Temer of Sonoma Instrument Co. for supplying additional 7470A documentation and providing extensive assistance with support for various HP instruments in the 1.60 release.
Thanks to Dr. Alfredo Rosati, I5UXJ for his contribution of the Tektronix 2782/2784 and HP 8510 support code, and to Ron Kittel, K8AQC, and Grant Hodgman, G8UBN for their extensive help with development and testing on the HP 3585A.
HP 54200-series DSO support provided by Abdul Nizar of Prologix.
If you find that 7470.EXE doesn't meet your needs, an excellent commercial alternative is PrintCapture. See the PrintCapture site for more information. Two more-expensive commercial packages from Aphena, which I haven't personally evaluated, are Plottergeist and SoftPlot. A good third-party renderer for HPGL files obtained from 7470.EXE is ViewCompanion.
Released into the public domain 24-Jan-01 by John Miles, KE5FX.
Please contact jmiles@pop.net with feedback and enhancements!
Source code compilable with the free Microsoft Visual Studio Express package
No warranties, expressed or implied, are offered with this program.
Use at your own risk!
source:
0 comments:
Post a Comment